Using PSE5
Open photo.
Duplicate- Ctrl. J
Re-name this layer “Sketch layer”
Enhance>Unsharp Mask
(about 20-60-0) OK
Filter>Stylize>Glowing Edges
(about 13-10-14) OK- adjust according to detail in photo.
Invert- Ctrl. I
Desaturate- Ctrl Shift U
Enhance>Adjust Lighting>Levels
Move white slider to left to get background whiter.
Move gray slider to get noise out.
Move black slider to right if you want lines to be darker…OK
Create a new blank layer below the top layer
(Hold Ctrl. & click on Create a new layer button) This will get it below top layer.
Edit>Fill layer>White. OK
Re-name this layer “white fill layer”
Highlight Sketch layer.
Blend mode to Overlay.
Highlight white fill layer.
Click Eraser Tool.
Pick Dry Media Brush-#63 at top of drop-down list- Might want to try others also.
Brush size about 600px.- Brush Opacity about 20% to start.
Start by erasing the whole page or what you want to show through.
Next step would be to erase over the whole page again. This makes it darker as you erase.
Keep erasing until you get it how you like it.
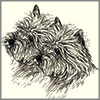
Sketches:

For a more detailed & darker result, I used this texture below.
Apply it to the Sketch layer & set the Blend Mode to Color Burn.
Highlight the white fill layer .
Click Eraser tool & start erasing again if you want more detail.
Erase until you get the result you want.

Sketch with Texture:

Open photo.
Duplicate- Ctrl. J
Re-name this layer “Sketch layer”
Enhance>Unsharp Mask
(about 20-60-0) OK
Filter>Stylize>Glowing Edges
(about 13-10-14) OK- adjust according to detail in photo.
Invert- Ctrl. I
Desaturate- Ctrl Shift U
Enhance>Adjust Lighting>Levels
Move white slider to left to get background whiter.
Move gray slider to get noise out.
Move black slider to right if you want lines to be darker…OK
Create a new blank layer below the top layer
(Hold Ctrl. & click on Create a new layer button) This will get it below top layer.
Edit>Fill layer>White. OK
Re-name this layer “white fill layer”
Highlight Sketch layer.
Blend mode to Overlay.
Highlight white fill layer.
Click Eraser Tool.
Pick Dry Media Brush-#63 at top of drop-down list- Might want to try others also.
Brush size about 600px.- Brush Opacity about 20% to start.
Start by erasing the whole page or what you want to show through.
Next step would be to erase over the whole page again. This makes it darker as you erase.
Keep erasing until you get it how you like it.
Sketches:
For a more detailed & darker result, I used this texture below.
Apply it to the Sketch layer & set the Blend Mode to Color Burn.
Highlight the white fill layer .
Click Eraser tool & start erasing again if you want more detail.
Erase until you get the result you want.
Sketch with Texture: