This has been posted before somewhere, but I didn't print it out, so of course now I couldn't find it. So I recreated the steps here in my own version.
1. Open photo
2. File>duplicate photo to preserve your "digital negative"
3. Now you can close your original and work on the duplicate.
4. Double click on the background layer to make it a regular layer, Layer 0.
5. On Layer 0, select what you want to be sharp. (Use whatever selection tool is right for your photo, or one that you are comfortable using.
6. Ctrl>J to duplicate that layer, creates Layer 1.
7. The marching ants have now disappeared. On layer 1, ctrl>click on the image in the layer to get the marching ants back again.
8. Go back to layer 0, and hit the delete key. (Removes the selection from Layer 0, but you still have it on Layer 1).
9. Still on Layer 0, go to select>inverse. Now you see the marching ants around your selection and also the entire photo. (This step isolates your main selection from the next step).
10. Still on Layer 0. Go to filter>blur>gaussian blur. Be sure your preview option is selected. Set the amount of gaussian blur that looks good to you. (I used 20 px on a photo that had a resolution of 230.)
11. Still on Layer 0, do ctrl>j as may times as it takes for you to see the white halo shrink behind your selection. And that's it! You can now save it as a PSD. You can always come back to it and change what you like. Or flatten the image if you like. (Layer>flatten image.)
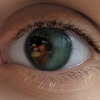
Before blurring:

After blurring:

1. Open photo
2. File>duplicate photo to preserve your "digital negative"
3. Now you can close your original and work on the duplicate.
4. Double click on the background layer to make it a regular layer, Layer 0.
5. On Layer 0, select what you want to be sharp. (Use whatever selection tool is right for your photo, or one that you are comfortable using.
6. Ctrl>J to duplicate that layer, creates Layer 1.
7. The marching ants have now disappeared. On layer 1, ctrl>click on the image in the layer to get the marching ants back again.
8. Go back to layer 0, and hit the delete key. (Removes the selection from Layer 0, but you still have it on Layer 1).
9. Still on Layer 0, go to select>inverse. Now you see the marching ants around your selection and also the entire photo. (This step isolates your main selection from the next step).
10. Still on Layer 0. Go to filter>blur>gaussian blur. Be sure your preview option is selected. Set the amount of gaussian blur that looks good to you. (I used 20 px on a photo that had a resolution of 230.)
11. Still on Layer 0, do ctrl>j as may times as it takes for you to see the white halo shrink behind your selection. And that's it! You can now save it as a PSD. You can always come back to it and change what you like. Or flatten the image if you like. (Layer>flatten image.)
Before blurring:
After blurring: