Here's a quick way to reproduce an Orton Effect with just a few steps using Photoshop or PSElments.
(An Orton effect results in an image that appears soft and super-saturated, while also maintaining crisp edges. It's an excellent effect for nature photography and closeups.)
Get started by duplicating your background layer and renaming the duplicate "Sharpened". Now duplicate your background layer again, and name the second duplicate "Sharpened Again". (You really don't have to rename these layers if you don't want to - I'm just using that as a way to clarify which layer gets edited).
Change the Blend Mode of the Sharpened Again layer to Screen, and flatten the image.
Duplicate this newly created Background layer again, and run a Gaussian Blur on it, starting with a setting of 4 or so (but it really depends on the size of your image). Use as much blur as it takes to soften and blur out the edges of your image while leaving just a little bit of detail still showing. Experiment with different settings to see what results you can get.

Finally, change the Blend Mode of this blurred layer to Multiply, and adjust the opacity if necessary - there's the entire effect.
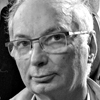
My start and finish images are posted - I added a simple black "faded frame" to it (make a rectangular selection, feather it a bit, create a new layer, invert the selection and fill it with black) - see what you can come up with.