I used this technique to create a poster for our neighborhood Fall Festival about a year ago.
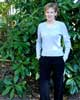
Start with the image you want to cut out. A photo with a definite subject is usually best, and action shots are especially effective.
For my example, I'm using a photo of a boy bobbing for apples.

Make a selection around the subject. I used the magnetic lasso for my initial selection, and cleaned it up with the freehand lasso once the initial selection was made.
You could use whichever tool you feel the most comfortable with - if you choose to use the Extract tool, though, be sure to duplicate the Background layer first.
When your selection is made, put the selected part on its own layer by pressing <Ctrl>/ <Cmd>+<J> . You should now have your subject on its own layer.
<Ctrl>/<Cmd>+ Click the subject's thumbnail in the layers palette to put a new selection around it, and expand this selection by clicking Selection>Modify>Expand and entering an appropriate number, based on the size of your image. This will create the white border around the cutout - I chose 5 pixels for the mid-sized image I started with.
Create a new layer, move it beneath the isolated subject layer, and with the selection still active, fill it with white:

<Ctrl>+Click the white-filled layer and the isolated subject layer, and from the Layer palette fly out menu, choose Merge Linked (or press <Ctrl>+<E>). This puts the white outline and the subject on the same layer.
Now <Ctrl>+Click the subject layer's thumbnail again to make yet another selection around it.
Create a new layer, move it beneath the subject layer, and with the selection still active, fill it with black.
Deselect (<Ctrl>+<D>), and run a Gaussian Blur filter (Filters>Blur>Gaussian Blur)to "fuzzy up" the harsh edge. This will be your drop shadow, so make it as blurry as you'd like.

Change the blend mode of this layer to Multiply, and adjust the opacity to 75% ~ 80% or so.
(I like this method for creating drop shadows better than using a standard Layer Style because it allows much more flexibility in adjustment, especially in Elements)
Move this layer slightly down and to the right with the Move tool (press <V>, and then use the arrow keys on your keyboard to nudge it around) to create the shadow effect - now you can tweak the opacity, blur, grain and just about everything about this layer much easier than messing around with the limited options of the layer styles palette.
To finish up the poster, I simply filled the background with a solid color and added my text.
You could easily drag this "cutout" into another document (such as a scrap page layout) or add a texture or other images to the background.

Start with the image you want to cut out. A photo with a definite subject is usually best, and action shots are especially effective.
For my example, I'm using a photo of a boy bobbing for apples.
Make a selection around the subject. I used the magnetic lasso for my initial selection, and cleaned it up with the freehand lasso once the initial selection was made.
You could use whichever tool you feel the most comfortable with - if you choose to use the Extract tool, though, be sure to duplicate the Background layer first.
When your selection is made, put the selected part on its own layer by pressing <Ctrl>/ <Cmd>+<J> . You should now have your subject on its own layer.
<Ctrl>/<Cmd>+ Click the subject's thumbnail in the layers palette to put a new selection around it, and expand this selection by clicking Selection>Modify>Expand and entering an appropriate number, based on the size of your image. This will create the white border around the cutout - I chose 5 pixels for the mid-sized image I started with.
Create a new layer, move it beneath the isolated subject layer, and with the selection still active, fill it with white:
<Ctrl>+Click the white-filled layer and the isolated subject layer, and from the Layer palette fly out menu, choose Merge Linked (or press <Ctrl>+<E>). This puts the white outline and the subject on the same layer.
Now <Ctrl>+Click the subject layer's thumbnail again to make yet another selection around it.
Create a new layer, move it beneath the subject layer, and with the selection still active, fill it with black.
Deselect (<Ctrl>+<D>), and run a Gaussian Blur filter (Filters>Blur>Gaussian Blur)to "fuzzy up" the harsh edge. This will be your drop shadow, so make it as blurry as you'd like.
Change the blend mode of this layer to Multiply, and adjust the opacity to 75% ~ 80% or so.
(I like this method for creating drop shadows better than using a standard Layer Style because it allows much more flexibility in adjustment, especially in Elements)
Move this layer slightly down and to the right with the Move tool (press <V>, and then use the arrow keys on your keyboard to nudge it around) to create the shadow effect - now you can tweak the opacity, blur, grain and just about everything about this layer much easier than messing around with the limited options of the layer styles palette.
To finish up the poster, I simply filled the background with a solid color and added my text.
You could easily drag this "cutout" into another document (such as a scrap page layout) or add a texture or other images to the background.