Some here, myself included, will occasionally post an image with the Orton Effect. Many (most?) of us know how to do that but some of you may not and some no doubt have forgotten. It is so easy, it's hard to believe this is all there is to it.
This is a direct quote from Kimi's homework assignment #13 of several years ago. Kimi doesn't come around here anymore so I'll take the liberty of borrowing from her past work
Here is a quick version of the directions.
Duplicate your image twice. Ctrl J
Change the top layer’s blend mode to screen.
Merge your screen layer down. Ctrl E
Duplicate your new image Ctrl J
On your new top layer Go to Filters, Blur, Gas Blur. Use enough that the shapes are still visible but the details are gone. Don't be afraid to blur.
Now change the blend mode on that layer to multiply.
Done!
If you ever have a lazy day and want to just play around with experimenting, why not create some Orton images the old fashioned way? Michael Orton would shoot two images: one in focus and one out of focus and then sandwich those negatives together. Because he was producing actual negatives (or transparencies)there were reasons to overexpose both images. As we are working with digital "negatives" that is not necessary and you will get good results with two images: one properly exposed and in focus, one overexposed and out of focus.
You need to use a tripod so that both images have the same content. Take your first shot - proper exposure and proper focus. Then, without disturbing your camera, switch to manual focus and change the setting to blur the image ... in the examples below I went from 12 inches (correct) to infinity (out of focus). Change your settings to overexpose the out of focus image. For the kind od camera I use, simply dialing in exposure compensation is the easiest way to do this.
I was surprised to discover that it didn't seem to matter how much or how little I overexposed the second image, the results were about the same.
To create your "Orton Image" open your two images in Elements (same procedure in Photoshop). Drag the overexposed out of focus image on top of the "correct image". Hold down the Shift-Key while you drag with the Move Tool and the two images will be automatically aligned. You have a file with two layers. Change the blend mode of the top layer to Multiply.
There are some subtle differences between doing it "in camera" as opposed to just using PSE to do as described in the above Homework.
Here is an example of the exposure differences achieved when taking the shots:
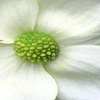
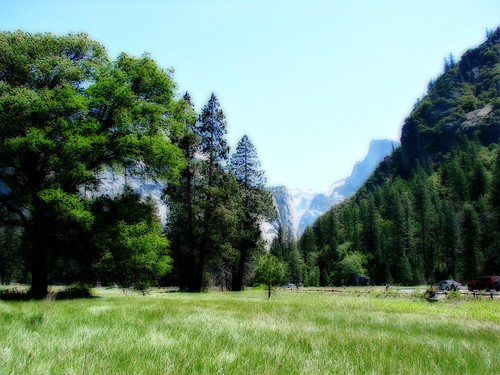
Here are examples of the two different Orton "methods":
Don't just try this with flowers ... I did because it was the easiest way to get images to illustrate this post. Orton works with Black & White, with just about any subject and you can really get some cool effects with pure abstract subjects.
Rusty
This is a direct quote from Kimi's homework assignment #13 of several years ago. Kimi doesn't come around here anymore so I'll take the liberty of borrowing from her past work
Here is a quick version of the directions.
Duplicate your image twice. Ctrl J
Change the top layer’s blend mode to screen.
Merge your screen layer down. Ctrl E
Duplicate your new image Ctrl J
On your new top layer Go to Filters, Blur, Gas Blur. Use enough that the shapes are still visible but the details are gone. Don't be afraid to blur.
Now change the blend mode on that layer to multiply.
Done!
If you ever have a lazy day and want to just play around with experimenting, why not create some Orton images the old fashioned way? Michael Orton would shoot two images: one in focus and one out of focus and then sandwich those negatives together. Because he was producing actual negatives (or transparencies)there were reasons to overexpose both images. As we are working with digital "negatives" that is not necessary and you will get good results with two images: one properly exposed and in focus, one overexposed and out of focus.
You need to use a tripod so that both images have the same content. Take your first shot - proper exposure and proper focus. Then, without disturbing your camera, switch to manual focus and change the setting to blur the image ... in the examples below I went from 12 inches (correct) to infinity (out of focus). Change your settings to overexpose the out of focus image. For the kind od camera I use, simply dialing in exposure compensation is the easiest way to do this.
I was surprised to discover that it didn't seem to matter how much or how little I overexposed the second image, the results were about the same.
To create your "Orton Image" open your two images in Elements (same procedure in Photoshop). Drag the overexposed out of focus image on top of the "correct image". Hold down the Shift-Key while you drag with the Move Tool and the two images will be automatically aligned. You have a file with two layers. Change the blend mode of the top layer to Multiply.
There are some subtle differences between doing it "in camera" as opposed to just using PSE to do as described in the above Homework.
Here is an example of the exposure differences achieved when taking the shots:
- DSC_0772_ Exposure.jpg (115.11 KiB) Viewed 6303 times
Here are examples of the two different Orton "methods":
- DSC_0772 Orton.jpg (119.44 KiB) Viewed 6303 times
- DSC_0778 Orton.jpg (70.29 KiB) Viewed 6303 times
Don't just try this with flowers ... I did because it was the easiest way to get images to illustrate this post. Orton works with Black & White, with just about any subject and you can really get some cool effects with pure abstract subjects.
Rusty