Post your before and after pictures here.
8 posts Page 1 of 1
I decided to put my buddy the squirrel to productive use :D

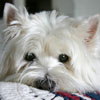
I have temporarily parked 4 images in my gallery, what I started with and three sketch versions.

#1 is out old friend, the sketch technique Anita shared some time ago and also put into the tutorial section here.

#2 starts with punching up the contrast of the starting image; then Anita's sketch was applied. Note: in that part of Anita's instructions where you drag a BG-copy up to put some color back in, I used the original BG-layer, not the contrasty one.

#3 is a more extreme version of #2. I made it contrasty to the point it almost became a B&W and, for Anita's sketch, I used the contrasty layer to add color, not the original BG.

Adding contrast is effective for some images, not sure if this one was the best choice -- it was pretty contrasty to begin with.

What do you think?

Rusty
There is a very fine line between "hobby" and "mental illness" - Dave Barry

If your pictures aren't good enough, you're not close enough. - Robert Capa

www.prestophoto.com/photos/gallery/19932
Great Job, Rusty! All three of them look good! :D
Really nice, love the look,Rusty. I have a question..what does stamp mean??? You should also put this in the tutorial section!!!
Thanks, Shari and Suzi,

Suzi, "stamp" is a good thing :D There are a lot of techniques where, you do various things to several layers and then merge those layers into one layer before proceeding to do other things. When you do that you have lost all ability to go back and make any changes to the two or three layers that now make up that one new (merged) layer.

Let's suppose you have 4 layers and you want to merge the top three into one layer (leaving you with only two layers). Turn off the eyeball of the bottom layer and, while sitting on the top layer, key Shift+Ctrl+Alt+E. That creates a new layer which is a "stamp" of all visible layers; the exact same thing as had you merged those layers into one.
stamp-visible.jpg
stamp-visible.jpg (142.86 KiB) Viewed 772 times


Note that, in the layer pallet, the new layer is simply named "Layer #" (I will rename it "stamp visi" so I can easily remember what it is. But, look in undo history and you see that action was identified as "stamp visible".

Now, if you get further along in doing stuff and think, "Gee, I wish I had done whatever...", you don't have to start all over. You can go back to one of those three layers, do your tweaking. BUT, you now have to delete that "stamped layer" and restamp it to reflect the changes made.

This is a pretty slick trick to remember. :mrgreen:

Rusty
There is a very fine line between "hobby" and "mental illness" - Dave Barry

If your pictures aren't good enough, you're not close enough. - Robert Capa

www.prestophoto.com/photos/gallery/19932
I am familar with the merge to new layer, never heard it called "stamp" before. Learn something new everyday. Thanks Rusty
Rusty, great job on the sketch.

Kim
My Creations
Canon 40D, Canon 28-135mm IS lens, Canon 300D, Canon 18-55mm lens, CS3


Kimz Kreationz Blog
Rusty Rusty Rusty, for such a destructive critter to work with you did wonderful work. I also love your house finch beautiful bird. He would make beautiful paper.
Rusty, great sketches. I like all of them. I can't tell you how much I've enjoyed all your updates in your battle against the squirrel. Keep it up. You'll win in the end --I hope. :lol:

Anita
8 posts Page 1 of 1

Who is online

Users browsing this forum: No registered users and 40 guests

cron