Hi everyone 
As always this assignment is open to EVERYONE who is reading the forum.
Our lesson never end so if you find this late, please feel free to add your image.
Remember.... if you see an image that you like, please leave a comment for your fellow students. Everyone likes a pat on the back.
There is no right or wrong process here. The point of the creative homework is... to be creative.
Just Jump in and Have Fun!!
A reminder.... this is not really homework. (it is just called homework) These exercises are open to everyone. Hope to see lots of entries!
~~~~~~~~~~~~~~~~~~~~~~~~~~~~~~~~~~~~~~~~~~~~~~~~~~
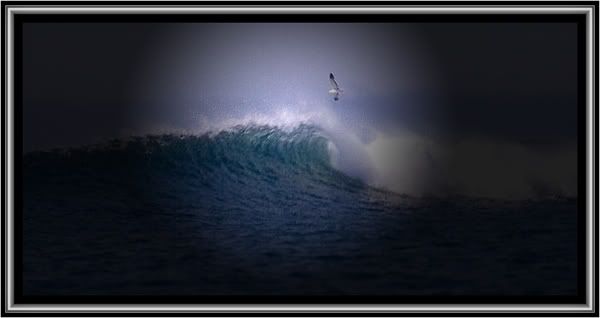
Make a Dramatic Focal Point!
This week we will pick part of our image to become the focal point.
Process your image as you normally would.
Create a new blank layer.
Hit "D" to set your color picker to the default colors of black and white. Now let's hit "X". We want white be on the top and black on the bottom.
Pick your gradient tool. Open the gradient picker and choose the first one. It will be white and black.
You will select your Radial Gradient on your top tool bar. (it is the second one)
Draw a small line where you want your accent to fall. You may have to undo a few times to get this just right.
I tend to draw a small gradient and use "Ctrl T" to free transform the size into what I need.
Now we want to see our image. Change your blend mode to multiply. Why? Because Multiply hides white so our focal point will show thru.
Lower your opacity on the gradient layer until you have an effect that you like.
Now Lets See Those Images!
As always this assignment is open to EVERYONE who is reading the forum.
Our lesson never end so if you find this late, please feel free to add your image.
Remember.... if you see an image that you like, please leave a comment for your fellow students. Everyone likes a pat on the back.
There is no right or wrong process here. The point of the creative homework is... to be creative.
Just Jump in and Have Fun!!
A reminder.... this is not really homework. (it is just called homework) These exercises are open to everyone. Hope to see lots of entries!
~~~~~~~~~~~~~~~~~~~~~~~~~~~~~~~~~~~~~~~~~~~~~~~~~~
Make a Dramatic Focal Point!
This week we will pick part of our image to become the focal point.
Process your image as you normally would.
Create a new blank layer.
Hit "D" to set your color picker to the default colors of black and white. Now let's hit "X". We want white be on the top and black on the bottom.
Pick your gradient tool. Open the gradient picker and choose the first one. It will be white and black.
You will select your Radial Gradient on your top tool bar. (it is the second one)
Draw a small line where you want your accent to fall. You may have to undo a few times to get this just right.
I tend to draw a small gradient and use "Ctrl T" to free transform the size into what I need.
Now we want to see our image. Change your blend mode to multiply. Why? Because Multiply hides white so our focal point will show thru.
Lower your opacity on the gradient layer until you have an effect that you like.
Now Lets See Those Images!